Showing posts with label Wood working. Show all posts

Friday, January 28, 2011

Squeezing the Life Out of Weeds Plants

My mom insisted that my two brothers, sister and I took specific projects in 4-H when we were kids. Our first year, we had to take Helping Mom & Dad (a ploy to get us to pitch in more) and Idaho Wildlife (in hopes of fostering naturalist feelings towards our native fauna). The second year, we could take one project of our choosing, and we also had to take a project on native weeds plants. Now, for me, that was torture. By that time, I had spent a summer out in the bean fields, grudgingly weeding (or, as I like to say, Hoe-ing. Yeah, so I can tell people that I was a professional Ho-er by the time I was 11. I get some craaaazy looks, and it amuses me so). I hated weeds and had no appreciation for their non-weedy kin. But I really wanted to take the other project (cooking, I believe), so I took up the flora cause and spent the summer collecting, pressing and preserving the various native and non-native weeds plants of Idaho's Snake River Plain. Yee-haw. (I guess there's some lesson in knowing one's enemy)
Why am I mentioning it? Because one of things we had to do as part of the project was create a weed plant press. And my mom's design was, quite honestly, ingenious, and I don't think I've seen it replicated. And lately, I've had this URGE to squeeze the life-blood out of the weeds plants that litter my landscape. So I decided to recreate my mom's ingenious weed plant press, and take some piccies of the finished product. Because, you know, *someone* might be planning on forcing their kidlets into taking a Flora Preservation/Appreciation project in 4-H or they're trying to foster some young naturalist tendencies in their precocious offspring.
Supplies:
  • Pre-finished Pegboard (~2' x 4' is sufficient) Mine has an enameled finishon one side, bare on the other
  • Long machine screws with round ends. Mine are 3" and 1.5"
  • Matching washers
  • Matching wing nuts
  • Jig or table saw
  • Newspaper or Corrugated cardboard
I didn't bother to take pictures of the process, as I was lazy and didn't think they'd add much (and I made enough mistakes that I would have felt embarrassed to have documented them).
First, I cut the pegboard into two 17" segments (leaving me a good amount left over), giving me two 17" x 24" boards. I cut ~10 off the length of these, making them ~17" x 14". Next, I put wrong-sides together (be sure to do this!!), and lined up the holes. I then used the table saw to cut off the excess. I did the same thing with the two 10" x 17" remnants, and then cut them in half length-wise, so I had two more small presses (I'll give one to my friend who loves wildflowers).
That's all it takes (plus the screws, washers, and wing nuts)--the press is now ready to use. All you have to do is take the screws and one washer per screw, and thread them through the four corners of one of pieces of pegboard. Layer newspaper (or corrugated cardboard; whatever floats your boat), a single layer of weeds plants, then more newspaper, then more weeds plants, etc etc. After a reasonable number of layers, add the matching piece of pegboard and slide it over the screws. Add the second washer and screw it down using the wing nuts. Et voilĂ ! An easy to use, easy to assemble weed plant press. For the larger press, I added a second set of screws/washers/wing nuts to the center of the lengthwise edge on each side, just to give it a bit more pressing power. The holes of the pegboard allow enough air to penetrate through the newspaper to adequately dry the weeds plants. It might not be as fancy-schmancy as some retail plant presses, but it works well for me!
I bought the 2' x 4' sheet of pegboard from Home Depot for $6.15. The screws, washers, and wing nuts cost $6.66 (freaked out the cashier!). So for around $14, I have three rather nice, quite kick-assery weed plant presses. Awesome.
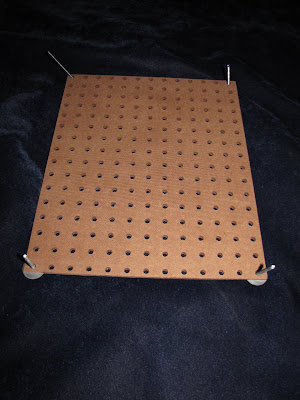
Click for more pictures, although they're just different shots of the same thing :o)
And, for good measure, a picture of Albert.

Thursday, July 1, 2010

It LIIIIIVES!!!!!!!!!!!!!!

By and large, the house is severely lacking in storage. In the three bedroom house, there are exactly three closets--that's it. There's no linen closet. There's no utility closet. Instead of making a closet underneath the stairs on the inside of the house, there's a closet on the outside. The vacuum cleaner, broom, carpet cleaner, etc are all "discretely" tucked behind trash containers and corners. In the flurry of house-buying oblivion, we didn't notice the lack of closets. A year later, we lament the lack.
One of the problem areas has been the foyer. We don't have a convenient spot to put keys and mail and incidentals, so they wind up other places and are easily lost. Last November, John and I decided to rectify that by building a console table. This was the original design:
We decided to use the Kreg Pocket Hole Jig that John had picked up previously. We bought some furniture-grade birch plywood, cut it down the dimension with the table saw. We first tested the straightness of the cuts by dry-assembling it with clamps.
Then we set up the jig and got to drilling.
The jig is incredibly easy to use.
We got the top, bottom and sides put together in short order. We cut the back panel. A few weeks prior, we were at Habitat for Humanity's ReStore, and found some pretty nice plain drawers (lacquered plywood with a melamine-coated Masonite bottom). I'm pretty sure they were intended to be kitchen cabinet drawers, but they'd work just fine for the console table. They were marked at $4 each, but were on sale for 50% off, so $4 for drawers was definitely do-able. The only problem was that the drawers were about 5 inches too long and wide, but we figured it'd be easy enough to disassemble them, cut them to size, and reassemble them. We got the first drawer done with no issues--it fit perfectly! The second drawer, I mis-measured, and we cut it the wrong size. Frustrated, we put the project on hold until we could buy a third drawer. A week or so later, we bought a third drawer and set it on top of the frame. And pushed the project off to the side of the garage, where it sat unfinished.
I was working on other projects and kept meaning to finish the console, but the thought of doing it myself was a bit daunting. Finally, I bucked it up in May, and drug the four-sided carcass to the work table. First thing I did was attach the back, which make it ever so much more stable and ever so much more HEAVY. I measured the correctly-sized drawer and cut the third drawer to match. Then I put the drawers into the table, expecting them to fit marvelously well. They didn't. In our measurements, we failed to take into consideration the inset back panel, so the drawers were about an inch too long. So, I disassembled both drawers (marking everything as I went so I wouldn't cut too much again!), made the corrections, reassembled them, and happily rejoiced when they fit.
At about this time, I also decided to attach the pine molding I had purchased for the project. I got it attached to the "top" of the cabinet, only to realize I had actually attached it upside down from what I had intended, and the glue had already set, so there was no way I'd be able to take it off without making a big mess. So what was once the bottom of the table became the top of the table. And I realized I hadn't measured correctly, and wouldn't have enough of the molding to finish the bottom. I took a trip to the lumber yard near my work and asked if they stocked pine molding with a cove edge. Nope. They could order me some alder molding with a cove edge.
After I got the bottom molding attached, I decided to modify my design and put the drawers on the bottom of the table. I also decided to add a little cubby between the drawers.
I used the Kreg jig to attach the two side pieces to the bottom, and also the middle shelf to the entire unit.I had loads of thinly shaved hard maple strips lying around from my brother in law's Christmas present, so I thought I could use those strips as edge-banding to cover the raw plywood edges of the table. I had more hard maple shorts lying around (they were cheap at the lumber yard!) and thought they'd make nice drawer fronts. I got those cut down to size and dry-fitted them.
After I was mostly satisfied with the assembly, I used stainable wood filler to cover brad marks and cracks.
When it was dry, I scraped off the excess.
And started a sanding regime. 80, 100, 150, 200 grit sand paper. Thank goodness for random orbital sanders! After I wiped it down with a wet rag, it was ready to stain.
I turned to my old reliable Red Mahogany stain (since it's what I have!). This is what it looked like after the first coat:
Unfortunately, the "stainable" wood filler wasn't all that stainable on the molding, so it's really obvious where the brads are. At that point, I was tired and flustered, so I decided to put a second coat on, paying special attention to the filled areas. After the second coat, they filler-spots are still there, but they're not as noticeable and my f-it attitude got the best of me, so I decided to just seal the f-er.
I put three coats of poly on the inside, sides, molding, drawer fronts, and legs. For the table top and the top of the shelf, I added three additional poly coats--just for good measure.
This is what the behemoth looks like, fully assembled:
It's HUGE!!!!!! Like, really really really big. I think I'm going to cut the legs down two more inches so it'll stand at counter height, and the ottomans will just fit underneath.
In my haste to get it into the house (by myself! I didn't want to ask John or Josh to help!), I accidentally chipped the molding on the top left hand corner of the piece. The SIX coats of poly were thick enough to keep the piece attached, so I'll have to glue it and then refinish it a bit. I call it my Frankenstein Console Table (hence the title of this post) because it's got birch, maple, alder, pine, and Douglas fur. I'm quite proud of myself for getting this huge thing made, mostly by myself. It was most certainly a learning project for me. I know that I need to make much more detailed plans before I begin a project, I know I need to measure not once twice or three times but four times before cutting, I know I need to make accurate calculations of materials needed before I set about cutting things up. Best of all, I know I can make a pretty nifty piece of furniture, all by myself. My mom tells me my great great grandfather was an expert furniture maker...I guess I've got a bit of that in my blood :o)

Thursday, June 24, 2010

Gabe's Christmas Puzzles

As the saying goes, the road to hell is paved with good intentions. My road is *very* well paved.
As you might recall, I had that BRILLIANT idea of doing a home-made Christmas with my family. Here it is, the middle of June, and I've FINALLY gotten all of my Christmas 2009 gifts sent to their respective recipients. When I hatched my BRILLIANT plan of making all of these Christmas presents, the responsibility was being shared with someone else. I got my part of the presents largely done before or slightly after Christmas, while I (im)patiently waited for the other person to do their part. Ish happened, and suddenly I was wholly responsible for getting everything done. So that's why it's taken THIS LONG to get everything done.
So, my young, impossibly adorably cute nephew loves Thomas the Tank Engine, as any sane little child ought to. Because, really, Thomas is awesome (I'll admit to watching some Thomas well past the "appropriate" "intended" age of consumption). I'm also a fan of gifts for kids that don't involve batteries or those that zap the creative imagination of childhood. I remember really really really really really really really loving board puzzles when I was a kid, and I decided that I would make a board puzzle for my impossibly adorably cute nephew.
I took some 1/4" Masonite/hardboard and cut it down to a rough 9"x11" rectangle. I found a nice picture of Thomas, and, using standard craft grade acrylic paint, I transferred the image onto the Masonite. I think I painted two layers of paint, and then an acrylic pen to make an outline of Thomas.
I slathered Thomas with several coats of Modge Podge, and then used my trusty scroll saw to freehand puzzle shapes. By Christmas, the puzzle was ready to ship out.
As the months after Christmas wore on, I started to feel really guilty about sending a single puzzle out. And then I remembered that my favourite board puzzles were those board puzzles that were on an actual board. So I decided I would make a board for my Thomas puzzle.
Using more Masonite, I cut a board about 1/2" larger on all sides than the original puzzle, and then cut 1/2" strips of Masonite. I glued those strips onto the perimeter of the board, and clamped them until everything was dry. After a light sanding, I spray painted the board with a white satin paint. Marvelous!
And then as the months continued to wear on, I decided I should (and could) make a second puzzle. Knowing my sister in law's love of the Denver Broncos, I decided to paint the logo into another board puzzle. I used the same steps as the Thomas puzzle, but instead of Mod Podge, I went over it with some varnish (it'll probably turn the white paint yellow over time, but it's a more permanent solution than Mod Podge).
After the puzzles and the boards were ready, I realized that they might be a bit difficult for a two-almost-three-year-old. So I traced the shape of each puzzle piece on the white board using a permanent marker. This is the Broncos board:
And this is the Thomas board:
And this is Thomas the Tank Engine, assembled on his board.
And this is the Broncos logo, assembled on its board:
All in all, I'm pretty darned proud of how the puzzles turned out. I think I'll make more in the future. Just not for Christmas 2010!

Wednesday, June 9, 2010

Puzzling Time

Last fall during the beginning woodworking class John and I were taking through the local CC, we were introduced to the Scroll Saw. I immediately decided that I liked the scroll saw, and that it and I would become best buddies. I liked that I could easily cut circles and waves, that it was relatively safe to use, and didn't take a lot of know how. I also liked that I wasn't confined to a pattern and measurements, as it's a much more free-form type of woodworking. The teacher had an unused scroll saw he had acquired when he purchased a bunch of equipment from a retiring woodworker, and offered to sell the saw at a deeply discounted rate. SOLD. It even looked a little bit like the Starship Enterprise, so it became my new little baby. So cute!
I started doing a little research into scroll saws, and found that many they were a huge fad a number of years ago, so there were TONS of resources available. About this same time, I hatched the HOMEMADE CHRISTMAS PRESENT plan with my siblings. I know my brother Mark really really really enjoys puzzles, so I thought I'd make him a puzzle. I Googled for inspiration, and came across this idea. I was smitten, and decided Mark would love a puzzle like that. Being ballsy and stupid, I didn't bother to read the instructions or print up the pattern; I just free handed it, and this is the result:Not too shabby, and I was awefully proud of it, if I do say so myself. Now that my brother is enjoying his Christmas present (so I shipped it off 5 months late? So what!), I decided to post about it. And then I also decided to make another one, for a Secret "Santa" exchange at an online community. I made a few reasonable changes in my method to accommodate the insane amount of time it took me to complete my brother's puzzle, and documented the procedure for posterity (certainly not for prosperity).
First, I took a 11" x 8" x 3/4" plank of pine, found the center line, and sketched out a rough tree-shape. Trying to keep the pattern centered is important to keep the puzzle balanced when it's standing up.I cut off large chunks of wood using the band saw, to make it easier to cut the pattern on the scroll saw. Also because I like the band saw, and never use it. It looked lonely, shoved off in the corner of the garage.
After I was satisfied with the band saw efforts (damned blade kept angling off to the side!---now I understand why it's shoved off into the corner of the garage!), I took the plank over to the scroll saw and started hacking away at the pattern.
Again, the appeal of the scroll saw to me is that I don't really have to follow the pattern, so I used it as a rough guideline for the basic shape of the puzzle. The only important thing was that the base and the trunk would fit together snugly when assembled. And it did! Next was sanding. First I used the random orbital sander with 80grit and then 150grit sand paper. I did both sides of the tree form.Then I broke out the paper and sanding pads, in 80, 100, and 150 grits to sand the outside edges of the tree, as well as the base.Sanding pads make sanding curves SO much easier. The person who first thought of them is my hero. I only wish I'd had them when I was refurbishing the wood chairs I bought from ReStore. When I was satisfied the plank was nicely sanded, I dusted it off, and used a damp rag to remove any lingering saw dust.

Now this is where my tutorial for this puzzle and the original tutorial (and how I did my brother's puzzle) diverge--rather than cut out the individual puzzle pieces now, I decided to paint the puzzle. The blade on the scroll saw is so fine, that I wasn't too worried about chip out from cutting into the painted surface, and it wouldn't be anything that a quick touch up would be able to handle. I decided to paint now because painting the individual pieces was a HUGE time suck, and painting it as a whole would give me the opportunity to make a more realistic looking puzzle.
I loaded three shades of green onto my paint "palette"--a bright green, a true green, and a ruddy green. I just used standard craft acrylic paint, because that's what I had on hand it and it was suited to the project.

Using a large flat brush, I splotched the paint onto the surface, dragging my brush through all three colours at the same time. I wasn't too worried about pattern, as I was more interested in creating background shading for the final treatment.

After the initial coat was dry, I picked up a smaller flat brush, dipped it in one of the shades, and dappled it onto the splotched surface. when the paint was running dry on the brush, I would dip it into a different shade, and add that colour to the area that was still wet. I added some yellow paint, as well, to work as a highlight colour.

I tried to keep the pattern as loose as possible, to make it look random and more realistic. When the first side was done, I painted the reverse side, using the same technique. I also painted the edge of the tree shape the same way.

Next was painting the trunk and adding some visible branches. For that, I used two colours of brown: a true brown, and a tinted brown. The true brown was the base, and I used the tinted brown to make the highlights/squiggly lines to simulate bark. I did front, back, sides, and the base. I tried as much as possible to mirror the branches near where the trunk met the leaves on both sides of the puzzle.

I waited 24 hours to make sure the paint and wood were bone dry. Then I took the plank out to the scroll saw, and free handed a puzzle pattern. The only trick here was to make sure the outside pieces and the trunk linked together snugly, to ensure that when the puzzle was standing, there was a solid band around the perimeter that would prevent it from falling apart. I also cut out some random negative space within the puzzle, and trashed those pieces--it would make the puzzle even more difficult to assemble.

I took the puzzle back in, and used the true green and true brown paints to paint the inside edges of the newly cut puzzle pieces. I didn't worry too much about sanding, as the scroll saw blade was supa fine. I also didn't worry about making the inside pieces realistic, as I thought it would make the puzzle WAY TOO HARD if you couldn't clearly tell which pieces were the boarder (I had to reassemble the puzzle, after all). Unfortunately, I didn't a picture of this. The only picture I have that shows the painted inside edges is one that incidentally shows them. Albert was being cute.

I didn't want the added heft of lacquer since some of the pieces were VERY snug when put together and I didn't have a whole lot of time to wait for coats to dry, so I decided to use outdoor Mod Podge, since it's waterproof.


Bad idea. The glue-qualities of the Mod Podge made the pieces stick together very uncomfortably. So I decided to use a clear coat spray paint in a matte finish. Worked like a charm. This was the finished product:

Even after making it myself, it takes me about 30 minutes to complete it. It's especially hard because both sides of the puzzle were painted the same way. All in all, I think this is the start of my scroll saw puzzle hobby :o) Click for more pictures of the process.

Tuesday, May 25, 2010

A Childhood Dream Realized

Something I have always always always wanted was a kitchen window that was spanned by gleaming glass shelves where I could store knick knacks and pretty things. I convinced myself that it'd take out some of the tedious boredom out of doing dinner dishes and that I just might look forward to the task. My mom (or was it my grandma) had this GORGEOUS puzzle that features coloured glass in front of a leaded glass window with an art deco motif. I loved loved loved it as a kid, and admire it each time I visit my sister (she wound up with it, completed it, and framed it). I think that probably largely shaped my overwhelming desire for the glass shelves full of knick knacks glinting in the sun.

One of the many features that attracted me to the house was the deep alcove behind the sink. I thought it would be a perfect place for my glass shelves. So I added it to The List.

My plan was hatched! There's some edge banding above the travertine back splash, and it juts out about an inch beyond the surface of the alcove sides--the perfect place for some panels!

I decided that the easiest thing to do would be to install some wood panels that were pre-drilled with holes for shelf support pegs. I had some extra MDF lying around from a different project, so I used the handy-dandy JIG IT Shelving Jig that John bought around Christmas time. The jig made it super easy to make uniform holes on both sides of each panel. I decided to include a router detail on the leading edge of the panels, so I attached a ogee bit to the trim router. I had a moment of brilliance, and spray painted a coat of primer on the MDF, then I installed the panels.

I just drilled directly into the sides, and countersunk the screws into the board. A little bit of Spackle and sandpaper, and it's hard to tell from a distance that they were ever there.

Next I filled the gap between the tile edge banding and the panels with some paintable caulking. I laid down a strip of painters tape to make it easier to clean up any wayward caulking (previous experience and the general thought that caulk probably doesn't clean up from travertine very easily necessitated this). After it was all dried, I cleaned up the edges with a straight edge, and got to painting.

Again, my previous experience with painting bookcases reminded me of how much of a bitch it is to keep paint out of peg holes. I've tried using QTips to clean the holes out after each coat of paint, and despite by damnedest efforts, the holes still get clogged to the point that it sometimes takes a hammer to get the pegs in the holes. I had an idea (I've probably seen it used some where before and just forgot, because I doubt I'm the first person to have this frigging brilliant idea, but until I know otherwise, I'll say that I'm the originator of the idea and I'LL SUE ANY ONE'S ASS if they don't give me credit for it!).

Drinking STRAWS!! That's right, ladies and gentlemen, a standard drinking straw fits almost perfectly snugly in a peg hole. I just took a handful of drinking straws, cut them down into 2-3" segments, and crammed them into the peg holes. I then went about my way, painting several (SEVERAL) coats of Behr white paint, and didn't worry about clogging holes. When everything was dry, I pulled the straws out of the holes and removed the painters tape. Most of the peg holes had some horizontal stalagmite growths coming out of them, but a wet rag and a soft scotch scour pad, they came off pretty easily. I suppose a straight edge would work well at cleaning up the holes..and probably a carving tool would work, too. I didn't think to get a picture, so you'll have to use your imagination.

Back in September, I bought some tempered glass shelves at Habitat for Humanity's ReStore for super duper cheap, so I was happy to get them installed. Imagine my disappointment when I discovered that the shelves were about an inch too short and about two inches too narrow to fit in the distance between the panels! ARGH.

But, I had another idea. I took another piece of MDF that was the same width as the panels I had just installed, routered about 1/8" out of the center of the panel so the side profile looked something like this: --_________--. I then cut that panel into 2" strips, and then turned those strips upright and used the table saw to cut a groove down the center of each strip--the groove is about 1" deep. After I got these strips primed and painted, I was set. I used some L-shaped shelf pegs on the panels. After they were installed on both sides, I inserted the strips so the groove I had cut would fit snugly over the shelf pegs. The strips provided the extra length and depth for the tempered glass shelves to sit on, and the routered detail provided a slight lip for the glass to rest between, to make it even more stable. HOORAY! I forgot to take a detailed shot of the supports, so you'll just have to imagine what they look like based on my horrible description.

Here's the finished product. I just put some random stuff up there for now; when I'm able to find more of the knick knacks I have, I'll add them to the collection and actually "stage" the area. You can see the strips I made for the shelves to rest on.

For now, I'm just happy to have my grandma's pretty glass pieces on display!

Click for more pics of the project at different stages. All said and done, I think I spent about $10 on the entire project (including the glass, MDF, paint, pegs and screws--and excluding the wood working equipment :o)

Tuesday, May 18, 2010

DIY Sunburst Mirror Design

So I've noticed an alarming number of design blogs that feature sunburst mirrors. And I WANT one, but I don't want to shell out the $200 (for a cheapie) to $1500+ (for a HOLY F). And with my false sense of belief in my woodworking abilities bolstered by the relative success with the magnetic knife holder I made for my brother in law, I've convinced myself that I would make my own sunburst mirror out of a 3" thick piece of wood cut into a circle, a bunch of dowels of different diameters, some circular wood cut outs, and a convex mirror (the type you'd expect to see on the side mirrors of a truck). And maybe some spray paint for a guilded look--haven't thought that far yet. I think it'll be a relatively easy project to complete. Hooray for band saws and drill presses!
So tonight, I decided to put my Word drawing skills to the test, and I made a mock-up of what the mirror will look like (or, at least, what I hope it will look like). I'll add this to the list of things I want to make, like the mailbox. Now, keep in mind that this is a Word "drawing" and it's not to scale or anything, but you get the idea.