
~Unknown
The overall arching theme of my third semester of Sculpture was Hope--being able to see the miraculous in the mundane. For my final project, I wanted to do something completely different than what I had previously done. I'm not really certain how I came up with the idea. Looking back, I think this might have been my motivation:
As a kid, I loved Lite-Brites. I have very fond memories of fighting Sarah over who got to play with it, relished every single time I pressed the pointy-end of the pin through the black construction paper and was mesmerized by the resulting beam of light (I guess it's the simple things, right?). While surfing online, I found this awesome "Push and Store Cabinet" designed by Chung-Tang Ho. It reminded me of those awesome Pin Art executive desk toys. I thought that perhaps I could combine my love of Lite-Brites with Pin Art and some how meld it into a HOPE-themed project. Whew.
I decided I would make a light box and use extruded acrylic rod to act as the pins for the project. I wanted to round one end of the "pin" and keep the other end flat. My hope was that this would turn the "pins" into small lenses. I bought 6-ft lengths in 5/8", 1/4", 1/2" and 3/4" diameters. I cut those rods down to ~3" segments, and wrapped painter's tape around one end.

To keep the rounded ends as symmetrical as possible, I loaded the rods into the chuck of my drill press. Since I don't have a lathe, this was the best solution. The only problem was that my chuck was 3/8" so I couldn't use this method to rounds out the larger stock. The taped end went into the chuck (the tape protected the end from being marred by the chuck).

Then I used some metal files to initially round the end. I started out with a file that was almost like a rasp, and move to finer files as I got the basic shape down.

After filing was done, I moved onto sandpaper. I started regular old coarse sandpaper in 80, 100, and 120 grits.


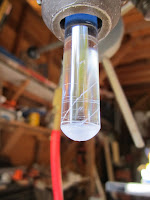
This is what the rounded end looked like after I was done sanding it with the 1500 grit paper. After I had rounded the ends of all the cut rods, I used a sanding block to sand the flat ends smooth. I skipped the files and moved straight on to the paper, starting at 80 grit and ending with 1500 grit. I hand rounded and sanded the acrylic rods that were too large to fit into the 3/8" chuck of the drill press, using the same procedure as sanding the flat ends. After all of the rods were rounded and sanded flat, I slathered on metal polish, and then used my fabric polishing attachment to my Dremmel and polished the heck out of each rod. Collectively, I'd say it took about 45 hours to do this (I'm not kidding!) process. It was a PAIN and took forever and ever.

Next I went about constructing my light box. I originally intended on using some really old walnut that I had lying around, but I nixed that when I realized I wanted to make the box several inches tall and my walnut was only 4 inches wide. I settled on some hard maple instead. First I cut the box sides to make a 6" x 9" x 6" rectangle. For my design, I wanted to have a sheet of acrylic glass suspended over the lights where I could attach an image. The I needed another sheet of acrylic suspended some distance from there where the rods would rest. Somehow I jammed up my palm router, so that was out of commission, so I had to use the table saw to cut the grooves for the box. It was slow work using the table saw, but it turned out well. Before I put the sides together, I sanded the insides. I fitted the box together using wood glue and nails, making sure to insert the first sheet of acrylic before putting on the final side. To elevate the box a bit from the surface below, I hammered in some decorative thumb tacks. This is the view of the bottom of the piece:

This is another view of the bottom, where you can see image that was inserted above the suspended acrylic sheet. You can also see the LED tap-light I used for illumination.

This is the top view of the image (a cloud with the sun peaking out behind it). This was set on top of the suspended acrylic sheet.

Here's the view with the lights on. I need to go back and sand the acrylic sheet to diffuse the light a bit.

And this is the view from the top with the second acrylic piece suspended.

I constructed a four-sided box (no top and no bottom) out of acrylic sheeting to contain the acrylic rods, and then assembled the rods on top of the acrylic sheet. I put the rounded end of the rods pointed towards the image, so the flat ends were at the top.
 Here you can see what the individual rods looked like after they were sanded and polished.
  And this is the view from the top of the piece.
  You can look through individual rod lenses to see the image behind them.
  See it? It's a cloud with a silver lining!
 This is how I wanted the piece interpreted: when we focus on the things immediately in front of us, they blur our vision to seeing the larger picture. The individual rods are like raindrops on a window--dreary and blurry. But they illuminate and magnify what's beyond them when you look closely at/through them.
 It doesn't photograph well, but it turned out exactly as I had imagine it :o) I think it has great potential for being a series of pieces. If only it didn't take so damned long to make! Click here to see more pictures of it.
No comments:
Post a Comment