Showing posts with label Crafts. Show all posts

Thursday, May 19, 2011

Thar Be Treasures! Part Deux

Waaaay back in the day, just after we bought the house, John was cabling the upstairs for tv and internet, and came across a lamp base behind the knee wall that surrounds the perimeter of the entire upper level. I had the grandiose idea that I would paint the base and attach some sort of awesome lamp shade and it would be an awesome homage to the origins of the house.
I started out by wielding a can of RustOleum Universal Hammered Spray Paint in Silver. It looked alright, though I wasn't omfg in love with it. So I stripped it with paint thinner (and killed off more than a few brain cells in the process. There goes algebra!) (Hah! as if I knew algebra in the first place!) and applied a new coat of Heirloom white. It looked pretty schnazzy, and I was happy with it.
Oh! I forgot to mention that the cord on the base was insanely old and one of the connectors was haphazardly attached, so I decided to rewire it. Simple task, to be sure. Except I kept blowing the breaker. Boo.
Next, I tackled the shade. I wanted something pretty and graphic, but didn't like the options I found online or in stores. I liked this one a lot, but I have a hard time spending $ on something I think I can do myself. So I went out to JC Penny and scored a big old drum shade at 40% off, and then went to Jo-Ann's to pick up some Jacquard Neopaque fabric paint in white, black, and deep red.
For the next forty hours or so (I *so* wish I was exaggerating), I hand painted the red blossom/black branch/white accent pattern on the shade. The paint was quite easy to work with, but I completely underestimated the total area of the shade that would need to be painted. So while the small/intricate pattern seemed easy peasy when I started, by the end it felt boring and tedious.
After the shade was finally finished, I attached it to base, and was pleased enough. I set it on the Frankenstein Table and moved onto the next project. A few weeks later, something fell behind Frankenstein, and rather than pull the ottomans out from underneath it to retrieve the item, I decided to pull the table over. As Frankenstein's are want to do, he lumbered forward and CRASH BAM BOOM, the legs collapsed and everything on top of it toppled off onto the floor. Pirate Lamp died, as did several small marble vases my mom had found for me. DAMN IT. AND I didn't even get a picture of the damned thing before it shattered.
So I spent several months trying to find a suitable replacement base for my magnificent lamp shade. I was determined the thrift it, because my mom and sister are such talented thrifters and certainly *I* would be able to do it! HAH.
As any sad and pathetic person might do, I was at Ikea on my birthday. I snagged a Jonsbo Barby lamp base in a pale pale pink. The only problem is that the base is designed for a Spider/Harp shade, and my shade is a Slip Uno Fitter. A tube of JB weld and wire cutters fixed the problem. And BAM, I had a gorgeous lamp with a magnificent shade.

Click here for more pictures of the new lamp with its beautiful shade :o)

Friday, January 28, 2011

Squeezing the Life Out of Weeds Plants

My mom insisted that my two brothers, sister and I took specific projects in 4-H when we were kids. Our first year, we had to take Helping Mom & Dad (a ploy to get us to pitch in more) and Idaho Wildlife (in hopes of fostering naturalist feelings towards our native fauna). The second year, we could take one project of our choosing, and we also had to take a project on native weeds plants. Now, for me, that was torture. By that time, I had spent a summer out in the bean fields, grudgingly weeding (or, as I like to say, Hoe-ing. Yeah, so I can tell people that I was a professional Ho-er by the time I was 11. I get some craaaazy looks, and it amuses me so). I hated weeds and had no appreciation for their non-weedy kin. But I really wanted to take the other project (cooking, I believe), so I took up the flora cause and spent the summer collecting, pressing and preserving the various native and non-native weeds plants of Idaho's Snake River Plain. Yee-haw. (I guess there's some lesson in knowing one's enemy)
Why am I mentioning it? Because one of things we had to do as part of the project was create a weed plant press. And my mom's design was, quite honestly, ingenious, and I don't think I've seen it replicated. And lately, I've had this URGE to squeeze the life-blood out of the weeds plants that litter my landscape. So I decided to recreate my mom's ingenious weed plant press, and take some piccies of the finished product. Because, you know, *someone* might be planning on forcing their kidlets into taking a Flora Preservation/Appreciation project in 4-H or they're trying to foster some young naturalist tendencies in their precocious offspring.
Supplies:
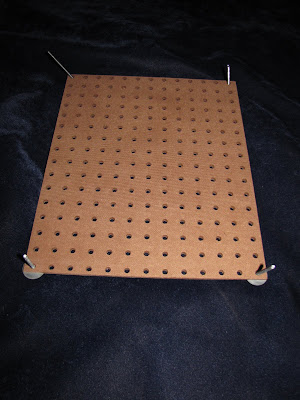
  • Pre-finished Pegboard (~2' x 4' is sufficient) Mine has an enameled finishon one side, bare on the other
  • Long machine screws with round ends. Mine are 3" and 1.5"
  • Matching washers
  • Matching wing nuts
  • Jig or table saw
  • Newspaper or Corrugated cardboard
I didn't bother to take pictures of the process, as I was lazy and didn't think they'd add much (and I made enough mistakes that I would have felt embarrassed to have documented them).
First, I cut the pegboard into two 17" segments (leaving me a good amount left over), giving me two 17" x 24" boards. I cut ~10 off the length of these, making them ~17" x 14". Next, I put wrong-sides together (be sure to do this!!), and lined up the holes. I then used the table saw to cut off the excess. I did the same thing with the two 10" x 17" remnants, and then cut them in half length-wise, so I had two more small presses (I'll give one to my friend who loves wildflowers).
That's all it takes (plus the screws, washers, and wing nuts)--the press is now ready to use. All you have to do is take the screws and one washer per screw, and thread them through the four corners of one of pieces of pegboard. Layer newspaper (or corrugated cardboard; whatever floats your boat), a single layer of weeds plants, then more newspaper, then more weeds plants, etc etc. After a reasonable number of layers, add the matching piece of pegboard and slide it over the screws. Add the second washer and screw it down using the wing nuts. Et voilĂ ! An easy to use, easy to assemble weed plant press. For the larger press, I added a second set of screws/washers/wing nuts to the center of the lengthwise edge on each side, just to give it a bit more pressing power. The holes of the pegboard allow enough air to penetrate through the newspaper to adequately dry the weeds plants. It might not be as fancy-schmancy as some retail plant presses, but it works well for me!
I bought the 2' x 4' sheet of pegboard from Home Depot for $6.15. The screws, washers, and wing nuts cost $6.66 (freaked out the cashier!). So for around $14, I have three rather nice, quite kick-assery weed plant presses. Awesome.
Click for more pictures, although they're just different shots of the same thing :o)
And, for good measure, a picture of Albert.

Tuesday, October 12, 2010

Birds of a Feather

The second medium that we worked with in my sculpture class was wire. The assignment sounded easy: using wire, create one sculpture that appears heavy, and one sculpture that appears light. We were to consider our materials, the colour, and the visual weight of our method when creating our sculptures (thin wire appears lighter than thick wire, silver wire appears lighter than black wire, simple lines appear lighter than tightly wound lines).

The first night of class at the beginning of the semester, when the instructor briefly talked about the materials we would be using, I had an instant idea of what I wanted to make out of wire. I was so excited about it that I couldn't get my mind to stop thinking about it when I went to bed, so I finally got up and grabbed my sketchbook and made a lovely scribble of the idea. Then I could sleep. I really wanted to make a bird.

My grandma was a great collector of bird sculptures. By then end of her life, she had (literally) hundreds of bird sculptures and trinkets. The curio cabinet she had commissioned was CRAMMED full of them. They perched on window sills and graced tabletops. They peaked out from behind books, and were gracefully poised on the floor. Now, 5 years after her death, I still have the fleeting "Grandma would like this" thought every time I pass a bird on a shelf. While my grandma's love of birds wasn't really the motivation for the sculpture, I can't help but draw a connection between the two.

So, for the first sculpture (heavy), I took some tie wire (the stuff used to tie rebar together) and wound it into a pear shape--this was the body. I got my Crawford on and cut up some wire hangers. I bent one length in half, and then bent the ends on themselves so they formed a "V" and then inserted it into the larger part of the body for the head. Then I wound more tie wire around the wire hanger to form a ball, with the two "V" shapes still poking out to form the beak. I created the wings using more hanger and bent them in the same manner as the head/beak, and attached them to the side of the body. I then wound more tie wire around them to cover up the hanger--when I got to the tip of the wings, I changed the way I wound the wire from vertical to horizontal, and I pinched the end of the horizontal to form feathers. The tail was formed the same way as the wing (vertical winding around the base, horizontal winding around the end). (I can't describe the process very well, and I didn't take pictures!). I then wove different gauges of jewelry wire and galvanized steel wire (22, 24, 28, 32 gauge) through the tie wire. I wanted the surface to have an almost stitched-together appearance, and weaving the wire achieved that.

For the bases of the two pieces, I wanted to take a stab at creating hypertufa, which I had read about on blogs last spring. It's basically faux stone made out of Portland Cement, Peat Moss, and Vermiculite/Peralite. I followed this recipe, and used the bottom of milk carton for the Heavy sculpture (I made it as square as I could) and the bottom of a small gift box for the Light sculpture. After the hypertufa had set a bit, I stick in more pieces of wire hanger (bent into a "U" shape, with the rounded part above the hypertufa) for the Heavy piece, and a length of welding rod in (bent into an "L" shape with the vertical part above the hypertufa) for the Light piece. After it was completely set, I bent the "U" so it went up vertically from the base, and then bent at a 45 degree angle about two inches up. For the Light base, I bent the rod into a curved shape similar to a shepherd's crook with an upward curve at the end.

After the bases were finished, I took the Heavy base and wound jewelry wire around the entire length of exposed hanger. I took four lengths of tie wire and bent two into a "U" shape, and then bent the ends so they faced down. The other two I kept straight, but I bent the ends down. I then attached a "U" shape and a straight wire to each "leg" of the hanger above the base. These formed the feet of the bird. I wound more jewelry wire around the feet/toes/legs of the bird, until I was satisfied that they looked sufficiently bird-like. Then I attached the body of the bird to the bent "U" of the hanger using tie wire and jewelry wire, and camouflaged the hanger as well as I could.

All in all, I'm EXTREMELY happy with how my Heavy piece turned out. It fits almost exactly what I had visualized when I was thinking of the project, and I think it successfully fit the parameters of the Heavy project. I think I took about 15 hours to make this bird (though at least some of that was because I'd never used wire for anything aside from unlocking doors or pulling trapped chip bags out of vending machines).
Everyone thought it was apropos that it looked like a Raven, considering Halloween is approaching. I think it's beautiful, and I'll happily keep it out year round. I was actually proud enough of it that I SHOWED it to someone at work!

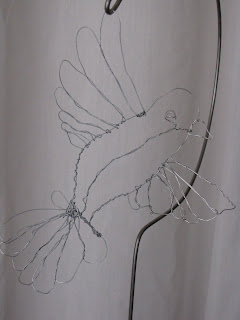
What I did for the Light piece was a bit more of a let down. Basically, I used 18 gauge wire to create the outline of a bird in flight. I used as little wire as I could get away with--3 separate lengths (one for the body/tail, two for each set of wings). It's not my best work, but it fit the parameters of the project.
One of my classmates liked the Light piece a LOT and asked what I was going to do with it. I said I didn't know, and she said that she would love to have it. So it's now cluttering up her room, I presume (or sitting in the trunk of her car, or populating the bottom of a waste bin....).

Wednesday, October 6, 2010

Beginning Sculpture: Medium #1 (Continued)

For the final project of Medium #1 (Foam Core Board), I had to create something that was a "walk-through" sculpture. Based on the cryptic description from the hand out the instructor provided us, I thought a walk-through sculpture was one where the viewer interacted with the piece, where they could easily see top and bottom of the piece but would need to move their entire body (not the piece itself) to do so. So I decided to create a mobile--dunno why, it just made sense.
I decided early one I wanted to do something involving a tessellation. I always loved the Escher tessellations, and thought it would be awesome to make one into a mobile. Since it was kind of a theme with the other projects in the medium, I went with a simple leaf pattern. I laboured through one whole class period (6pm-9pm) trying to get the pattern right, where all the angles matched up. I failed and I cried and I thought about mass executions. I then tried to make the tessellation using a graphics program, but the angles didn't match up. I failed and I cried and I thought about mass executions. Finally, I buckled, found the tessellation of a leaf that I liked, printed it out, cut out one of the leaves, blacked it out, enlarged it via photocopy and printed it on a card stock sheet of paper. I then laminated it with packing tape, cut it out, and used it as a template. I cut as many leaves as I could using the left over foam core I had. After I cut them out using a very sharp Xacto knife, I peeled the top layer of poster board from one side of half of the leaves. In the other stack of leaves, I flipped them over and peeled the new top layer of poster board. After that, I used a blunt point to "etch" a vein pattern onto the top and bottom of all the leaves, then strung two together using fishing filament; I used different lengths of filament. After all of them were paired off and strung together, I attached them to a simple T-shaped hanger (two strips of straight-cut foam core glued together). Et Voila! A simple mobile. Here's the piccies:
Click here for more.

Monday, September 13, 2010

Beginning Sculpture: Medium #1

As you might or might not be aware, I'm taking a Beginning Sculpture class at the local CC. Throughout college, I always *meant* to take a sculpture class, because I have it in my mind that I could be very good at sculpture (no false modesty here!). It never worked into my schedule, and I wasn't too enamored with the professor that taught the class. Then when I started taking classes at the CC, all of the art studio classes were taught during the day or on Saturdays, and I couldn't justify taking a 3 hour block out of work M/W mornings for a hobby class. This fall semester was the first time I noticed the sculpture class being offered at night, so I decided to throw caution to the wind and brave the horrible parking situation at the CC and just take the class.

The first night of class, the professor handed out the syllabus and schedule, and a few supplemental sheets of information including a list of the four types of "three dimensionality:" low relief, one-sided, full round, and walk through. He told us our first medium would be foam core board (for those of you unfamiliar with it, it's basically two sheets of poster board glue to either side of a mm thick piece of low-density foam). He preferred we use white board, and if we HAD to use some other colour, we had to justify its use. And if we HAD to use some other paper material, we had to justify its use. Even after paying a $15 materials fee on top of standard registration, we have to provide the VAST majority of our own supplies--something I never had to deal with at the private liberal arts school I went to for college. He talked about low relief sculpture, and used the example of a coin--the image on the coin is considered low relief, and then set us about to work. Unfortunately, I missed the second class sessions because of car issues, and showed up the third class session with a vague idea as to the low relief sculpture I was going to make using my foam core board. At some point during this class session, the professor mentioned we would have to have all four of our sculptures ready for evaluation the following Wednesday (to the utter dismay of everyone in the class, because at no point during the preceding class sessions did he tell anyone that we had to complete a sculpture for each of the four types of three dimensionality). So I got busy this weekend and got three of the four projects done. I have NO idea what I'm going to do for the fourth one...poo.

Low Relief Sculpture. This is the one I created first. Outside the classroom, there's a large free-standing enclosed stair well that connects the lower campus to the upper campus. It rises about three stories. It's cinder block, and at one point, it's very clear that it used to be COVERED in ivy that has since died off. All the remains, clutched to the cinder block, are fragments of dead stems, leaves, and the debris that got caught. For some reason, I find it fascinating, and I decided I would use it as inspiration for my first project. I took the foam core board and laid out a grid of bricks and mortar. I cut through the top layer of poster board and the foam core, and stopped cutting before I completely pierced the back layer of poster board. I carefully dug out the foam core, leaving behind small pieces of foam, and the backside of the back poster board. I then carefully pealed off the very top of the poster board around the bricks, leaving behind the rough paper (to simulate the texture of brick). I used the strips of foam that I had pulled away from the "mortar" to make the stems of the ivy, rolled them in my fingers so they had a slightly tubular shape, and hot-glued them to the bricks and mortar. The slightly larges pieces of foam core that were left over were formed into loose leaf shapes and glued on the board, as well. All in all, I'm happy with how it turned out, though I'm not sure someone would know what it's meant to be by just looking at it. I'm quite happy that I managed to make the entire sculpture out of one piece of foam core and glue :o)

One-Sided Sculpture. Next I tackled the one-sided sculpture. I'm not 100% certain as to what differentiates a one-sided sculpture from a low relief work, as the professor never explained it and the sheet he handed out was a bunch of gibberish, but I took a stab at it anyway. Last week, one of the neighbours' cats killed a bird in my backyard. There were feathers ALL over the place. I quite like birds and I quite like feathers, so I grabbed one of the feathers, washed it with anti-bacterial soap (see, Mom, I did listen at least once during my childhood!), dried it, and set about recreating it in paper. I loosely sketched out a feather on a sheet of white card stock. For the quill/rachis part of the feather, I used a pick to gently mar the surface of the paper, and then cut out the feather shape. I cut tiny, thin strips from the paper to simulate the soft after feathers closest to the quill. Then I cut the barbs along the length of the father, making as tiny, thin strips as I could with scissors. As the paper was cut, it curled gently, which nicely simulated real barbs. After completing all the cuts, I gently molded the marred center quill/rachis so that it was slightly raised, and then mounted the whole feather on the foam core, using strips of foam core to raise the feather from the surface. I *think* it qualifies as a one-sided sculpture!

Full Round Sculpture. Lately, I've been really interested in leafless trees (as evidenced by the large drawing I did for the down stairs bathroom back in March, and the smaller drawings I've been working on since then that I'll eventually frame and post). For this project, I wanted to make a leafless tree sculpture. I cut two similarly sized trunks/large branch pieces from the foam core, cut a slot down the top side of one trunk and along the botton side of the other trunk, so when the were matched together, they would form a standing tree shape. I then cut 4-more quarter trunks (flat side with the opposite side bring the trunk) with more branches sprouting from the top. I used my Xacto knife to bevel the straight edge of each quarter trunk piece so that when I glued them to the free-standing trunk, they would fit nicely. Bleh--it's really hard to describe it, and I didn't think to take pictures of the steps, so I just sketched out what I did here:
I then hot glued the quarter trunk pieces to the free standing trunk, making sure all bottom edges were flat and level.
After the base was formed, I used more card stock and cut random branch shapes. I then cut holes in the branch portion of the foam core tree and inserted the card stock branches into the holes. In most instances, they held quite easily to the foam core--I hot glued a few of them to keep them in place. I then created a 4" x 1" base for the sculpture using more foam core (cut one 4"x4" piece, two 1"x4" and two 1" x 3-5/8" pieces, and hot glued them together. I then put a whole heaping gob of hot glue on the top of the base, and set my tree sculpture on top, wedging it into the glue to ensure proper adhesion.

I didn't want a stark base, so I decided I needed some leaves. To make the leaves, I used more card stock and used by pick to draw a straight line down the length of paper. I then created a chevron pattern on either side of the line, again using the pick. Then I cut the line/chevron strip off the paper, used the line as the center point and folded the strip in half length-wise. I then cut out crescent shapes that, when flattened, formed leaves. I varied the size and shape of the leaves I cut out. Next, I glued the leaves to the base using tacky craft glue, trying to cover the entire base and the hot glue as much as possible. Here's the finished product:
And a close up shot of the leaves/base/trunk. I'm pleased with the leaves, especially.
Since all of the projects were done on white paper/foam core board and I'm not an ace photographer, the pictures didn't turn out spectacularly, so keep that in mind. Click here for more pictures of the projects. As I make more pieces, I'll update the blog/Flickr gallery.

Tuesday, September 7, 2010

Container Gardening for Dummy

Last spring, several Home Improvement/Decorating blogs were a frenzied with hanging succulent gardens created with Whirly Hanging Candleholders from CB2. Cute, to be sure. I was reminded that during college, I invariably had a hanging fishbowl that I fashioned out of a clear glass replacement light globe I snagged at the local Ace Hardware. I wrapped the lip with wire, and suspended it from the ceiling using a plant hook. It worked wonderfully, and was the happy home to a series of gold fish and betas (after I figured out that gold fish DO NOT do well in tiny enclosed spaces). When I moved to California, I took my suspended fish tank with me, and it hung in the kitchen of the first house I lived in, where it promptly sat neglected and became a happy home for massive amounts of algae. At some point, a rowdy roommate smashed the globe, and that was that.
After seeing the various incarnations of the hanging succulent garden using the Whirly Hanging Candleholders, I figured that my hanging fishbowl idea would work just as well, so I trundled down to my local Ace Hardware store and picked up three clear glass replacement light globes. Then to Home Depot to get some succulents ($1.79 each) and some Miracle Grow Cactus and Succulent Mix potting soil. I also got some polish river rock for aquariums (a bag of small pebbles and a bag of large pebbles).
First, I took some malleable wire and wrapped the lip of the glass globe around 5 times. Before twisting the loose ends together, I took (2) 4" lengths of the same wire and looped it under the wire around the rim--these pieces would later be used to attach the globe to some chain. I twisted the ends around each other as I pulled the wrapped wire as tight around the lip as I could.
After the wire was attached, I placed about 1/2 cup of the small river rock in the bottom of the blog. Then I scooped in about a cup and a half of the Cactus Mix potting soil. After removing the succulent from its retail holder, I loosened the roots and broke away some of the potting soil, and then placed the succulent in the globe. Since the opening for the globe is quite small and my Big German Hands are big, it took quite some maneuvering to get it placed and settled. I really gently mixed some of the potting soil with the small river rock pebbles, to provide for good drainage. After I felt the succulent was sufficiently anchored, I covered the leaves with an inverted plastic soufflé cup (any small cup would work) to protect the leaves as I sprinkled in some larger river rock pebbles along the surface of the soil. Although the larger pebbles are for aesthetics, I think they make it look purty. When all three succulents were planted, I gave them a thorough watering, and cleaned the inside of the visible glass surface.
I wanted to put my succulent garden in the arched south-facing window in the foyer, as it gets excellent light year round, and is visible from the street/parking pad and is a favourite perching spot for the kitties. I found the center of the window and inserted a swivel ceiling hook into the arch frame, and then put two more hooks equal-distance from the center hook. Next, I attached some chain to the globe, using one of the 4" lengths of wire I had inserted into the wrap before twisting the wire tight around the lip of the globe. A few twists and wraps, and it was secured. I then figured out how far I wanted the globe to drop, and cut the chain and secured the other side of the chain. I did this for all three globes. After I was done, I marveled at my cute little garden and vowed I would do my best to keep them alive. Since they're succulents that love light and warmth, and require infrequent watering, there's a good change I might not kill them right away. Keep your fingers crossed!
The hanging garden! The window is double-paned, and there's some spotting between the panes from condensation, so I promise you the inside and outside of the window is nice and clean--it's between the panes that isn't. And there's no way to clean between the panes without breaking one of them. Drat.
This is Crassula Argentea Compacta, or Compact Mini Jade. The neighbour to the left used to have massive jade plants, but for some reason they killed them off over the last year. Tis sad, as I'm sure the plants were at least 50 years old.
This is Echeveria 'Ramillette.' It reminds me of artichokes.

This is Graptoveria 'Moonglow.' As the leaves die, they turn a nice pink-orange (notice that one is already dying. Poo).
Click for more pictures of the succulent garden.

Wednesday, September 1, 2010

Mountain Landscape

My friend Mickey asked me to make a birthday card for his wife's birthday, and since I'm quite fond of Mickey and Carrie, I immediately agreed (despite having many unfinished projects looming over me, and school starting).
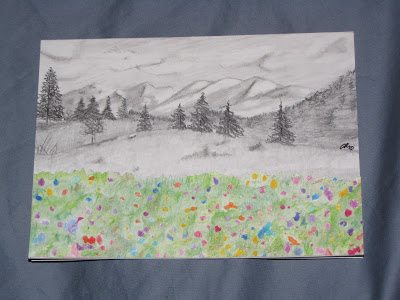
Mickey's only direction was that he and Carrie would be spending the upcoming weekend in the mountains, and since they're both avid back packers, something mountain/wildflower themed would be nice. I waited until inspiration struck, and decided to do a multi-medium piece, using graphite (I'm just getting back into graphite, after not using it for art purposes for nearly 9 years), watercolour, and Prismacolours.
First, I found a photograph of mountains that I liked by searching with Google Images. I sketched it out on a 5x7 piece of card stock with my graphite pencils. I've forgotten how much I enjoy graphite, how easily it blends and erases. I was a bit clumsy to start out, but quickly remembered how easy and forgiving it is to work with. After I was satisfied with the black & white portion of the card, I took a separate sheet of card stock and sketched out the area I would need to cover. Next, I used some masking medium and a paint brush to "dot" the paper randomly, not really caring too much about the shape of the dots and their arrangement. I then used my trust water-soluble watercolour pencils in light green, dark green, light brown, and dark brown to fill in between the dots. A quick wash with a barely moist paint brush later, and I had a nice background for my wildflower field. After the paper dried, I used an eraser to remove the masking medium, which resisted the paint, leaving white dots behind. I then used my Prismacolours to fill in the white dots. Finally, I cut the wildflower field out and glued it to the original 5x7 card.

Monday, August 23, 2010

Beading Frenzy

It's not really related to my house, but I promised my mom I would share with her the pictures of the necklaces/earrings I made this weekend. Carrie came over on Saturday, and we got our Crafty-Geekness on, and made some jewelry. Carrie finished a necklace her sister had asked for long ago, as well as another necklace using some of her beads and some of mine--both turned out lovely, though I didn't think to snap some pictures of them. I made three necklaces/earring sets, and then felt like making more on Sunday.
The first set I made, I used some lovely rose-coloured glass beads, as well as some mirrored clear seed beads and some silver-plated beads, with a gemstone pendant (quartz?) . I really like how it turned out.
Next I decided to finally do something with the jade-coloured stone beads I had picked up several years ago. I mixed in some sea foam coloured glass beads, as well as some more mirrored clear seed beads. I'm not sure if I'll wear it much, but it's a nice addition to my jewelry.
The final necklace I made on Saturday was a mixture of crazed earthenware pieces, black glass round beads, mirrored grey tiny seed beads, and a large quartz pendent. I know I'll get a lot of use out of this set!Albert decided to inspect the goods as I was taking pictures.On Sunday, I was sifting through my larger glass beads, and decided to make something out of these aquamarine faceted glass beads I bought several years ago. I used some pearlized seed beads and some of the left over glass jade coloured beads from the second necklace I made on Saturday. It's kind of Flintstones-esque but I think it's purty.
The second set on Sunday used up the rest of the rose-coloured glass beads from the first necklace on Saturday, as well as a rose-coloured glass pendent. I think it's awefully pretty!
The final piece I made on Sunday used this beautiful raspberry-coloured quartz pendent as its center-piece. While the glass beads aren't an EXACT colour match, they were close enough to not be distracting. I love it, and actually wore it to work today (it's a much lighter colour than it appears in the pictures).
Every six months or so, I get the itch to just bead and bead and bead and bead. And then I lose interest and move onto some other craft. I wonder how long I'll remain on this kick :o) I should make some Christmas gifts while I'm feeling it!

Tuesday, June 29, 2010

2009 Family Christmas Ornaments

As I have mentioned, my grandmother made beautiful beaded Christmas ornaments. Each year, all of her grandchildren could pick out a single ornament from her bevy of creations. As a child, this was a fun tradition, and now as I look at my amassed collection as an adult, it makes me feel a bit more connected to my grandparents.


Last October, I decided I would take a stab at making my own ornaments for my family. First, I designed what I wanted them to look like. I used Microsoft Word, so nothings to scale and I made some design tweaks when I actually made them. I decided to use silver sequins of varying size, white pearl beads, seed beads, silver stick pins, and black velvet ribbon.

And copious amounts of GLUE. Now, before I started on the first ornament, I had a healthy appreciation for the beautiful ornaments my grandmother so lovingly created. As my calloused thumb pushed the final pin into the final ornament, I had a healthy appreciation for the dedication and pure insanity of my grandmother. Wowie wow wow. It took me something like three weeks to make all of the ornaments. I figure I worked on them about 2-3 hours a day, 5 days a week. Wowie wow wow. And I'm not even as meticulous as my grandma was! I didn't CARE if there were exactly the same number of pearls on each ornament! She would count beads and measure distances! Sheesh. I also discovered that not many craft/hobby stores carry a decent selection of Styrofoam shapes and sequins. I bought out the entire selection of sequins and push pins at two different Joanns and had to go back two more times. Sheesh!

But, as I pushed the last pin in, I was very proud of the ornaments, and I know my siblings, parents, and aunt and uncle will appreciate them.

The basic design of the ornaments stayed the same; I just changed the colour of the seed bead to reflect the favourite colour of the recipient. My mom said she preferred ruby, emerald, and Sapphire, while my dad preferred emerald.For my maternal uncle and aunt, I used lovely blue seeds.My oldest brother got another blue ornament, and my sister in law got green. My young nephew, who might or might not have a favourite colour, got an ornament with Denver Broncos colours (his ornament was smaller, and I didn't use an velvet on it--just pearls, sequins, and seed beads). My brother Mark said he preferred browns and grays, so his ornament was tone-on-tone silver.
My sister's favourite colour is red, while my brother in law's is dark Trojan red.

John's was in his Broncos colours.I still haven't made my ornament. When I ran out of silver sequins and velvet ribbon, I made a pink (PINK!!!) starburst ornament. I've had those pearlized pink beads for 15 years and never made anything out of them, even though I've always thought they were pretty. So I decided to use them on the ornament. While pink's not my favourite colour, I sure do think it's a pretty ornament. Click for more blurry, out of focus, low light pictures.

Thursday, June 24, 2010

Gabe's Christmas Puzzles

As the saying goes, the road to hell is paved with good intentions. My road is *very* well paved.
As you might recall, I had that BRILLIANT idea of doing a home-made Christmas with my family. Here it is, the middle of June, and I've FINALLY gotten all of my Christmas 2009 gifts sent to their respective recipients. When I hatched my BRILLIANT plan of making all of these Christmas presents, the responsibility was being shared with someone else. I got my part of the presents largely done before or slightly after Christmas, while I (im)patiently waited for the other person to do their part. Ish happened, and suddenly I was wholly responsible for getting everything done. So that's why it's taken THIS LONG to get everything done.
So, my young, impossibly adorably cute nephew loves Thomas the Tank Engine, as any sane little child ought to. Because, really, Thomas is awesome (I'll admit to watching some Thomas well past the "appropriate" "intended" age of consumption). I'm also a fan of gifts for kids that don't involve batteries or those that zap the creative imagination of childhood. I remember really really really really really really really loving board puzzles when I was a kid, and I decided that I would make a board puzzle for my impossibly adorably cute nephew.
I took some 1/4" Masonite/hardboard and cut it down to a rough 9"x11" rectangle. I found a nice picture of Thomas, and, using standard craft grade acrylic paint, I transferred the image onto the Masonite. I think I painted two layers of paint, and then an acrylic pen to make an outline of Thomas.
I slathered Thomas with several coats of Modge Podge, and then used my trusty scroll saw to freehand puzzle shapes. By Christmas, the puzzle was ready to ship out.
As the months after Christmas wore on, I started to feel really guilty about sending a single puzzle out. And then I remembered that my favourite board puzzles were those board puzzles that were on an actual board. So I decided I would make a board for my Thomas puzzle.
Using more Masonite, I cut a board about 1/2" larger on all sides than the original puzzle, and then cut 1/2" strips of Masonite. I glued those strips onto the perimeter of the board, and clamped them until everything was dry. After a light sanding, I spray painted the board with a white satin paint. Marvelous!
And then as the months continued to wear on, I decided I should (and could) make a second puzzle. Knowing my sister in law's love of the Denver Broncos, I decided to paint the logo into another board puzzle. I used the same steps as the Thomas puzzle, but instead of Mod Podge, I went over it with some varnish (it'll probably turn the white paint yellow over time, but it's a more permanent solution than Mod Podge).
After the puzzles and the boards were ready, I realized that they might be a bit difficult for a two-almost-three-year-old. So I traced the shape of each puzzle piece on the white board using a permanent marker. This is the Broncos board:
And this is the Thomas board:
And this is Thomas the Tank Engine, assembled on his board.
And this is the Broncos logo, assembled on its board:
All in all, I'm pretty darned proud of how the puzzles turned out. I think I'll make more in the future. Just not for Christmas 2010!

Wednesday, June 9, 2010

Puzzling Time

Last fall during the beginning woodworking class John and I were taking through the local CC, we were introduced to the Scroll Saw. I immediately decided that I liked the scroll saw, and that it and I would become best buddies. I liked that I could easily cut circles and waves, that it was relatively safe to use, and didn't take a lot of know how. I also liked that I wasn't confined to a pattern and measurements, as it's a much more free-form type of woodworking. The teacher had an unused scroll saw he had acquired when he purchased a bunch of equipment from a retiring woodworker, and offered to sell the saw at a deeply discounted rate. SOLD. It even looked a little bit like the Starship Enterprise, so it became my new little baby. So cute!
I started doing a little research into scroll saws, and found that many they were a huge fad a number of years ago, so there were TONS of resources available. About this same time, I hatched the HOMEMADE CHRISTMAS PRESENT plan with my siblings. I know my brother Mark really really really enjoys puzzles, so I thought I'd make him a puzzle. I Googled for inspiration, and came across this idea. I was smitten, and decided Mark would love a puzzle like that. Being ballsy and stupid, I didn't bother to read the instructions or print up the pattern; I just free handed it, and this is the result:Not too shabby, and I was awefully proud of it, if I do say so myself. Now that my brother is enjoying his Christmas present (so I shipped it off 5 months late? So what!), I decided to post about it. And then I also decided to make another one, for a Secret "Santa" exchange at an online community. I made a few reasonable changes in my method to accommodate the insane amount of time it took me to complete my brother's puzzle, and documented the procedure for posterity (certainly not for prosperity).
First, I took a 11" x 8" x 3/4" plank of pine, found the center line, and sketched out a rough tree-shape. Trying to keep the pattern centered is important to keep the puzzle balanced when it's standing up.I cut off large chunks of wood using the band saw, to make it easier to cut the pattern on the scroll saw. Also because I like the band saw, and never use it. It looked lonely, shoved off in the corner of the garage.
After I was satisfied with the band saw efforts (damned blade kept angling off to the side!---now I understand why it's shoved off into the corner of the garage!), I took the plank over to the scroll saw and started hacking away at the pattern.
Again, the appeal of the scroll saw to me is that I don't really have to follow the pattern, so I used it as a rough guideline for the basic shape of the puzzle. The only important thing was that the base and the trunk would fit together snugly when assembled. And it did! Next was sanding. First I used the random orbital sander with 80grit and then 150grit sand paper. I did both sides of the tree form.Then I broke out the paper and sanding pads, in 80, 100, and 150 grits to sand the outside edges of the tree, as well as the base.Sanding pads make sanding curves SO much easier. The person who first thought of them is my hero. I only wish I'd had them when I was refurbishing the wood chairs I bought from ReStore. When I was satisfied the plank was nicely sanded, I dusted it off, and used a damp rag to remove any lingering saw dust.

Now this is where my tutorial for this puzzle and the original tutorial (and how I did my brother's puzzle) diverge--rather than cut out the individual puzzle pieces now, I decided to paint the puzzle. The blade on the scroll saw is so fine, that I wasn't too worried about chip out from cutting into the painted surface, and it wouldn't be anything that a quick touch up would be able to handle. I decided to paint now because painting the individual pieces was a HUGE time suck, and painting it as a whole would give me the opportunity to make a more realistic looking puzzle.
I loaded three shades of green onto my paint "palette"--a bright green, a true green, and a ruddy green. I just used standard craft acrylic paint, because that's what I had on hand it and it was suited to the project.

Using a large flat brush, I splotched the paint onto the surface, dragging my brush through all three colours at the same time. I wasn't too worried about pattern, as I was more interested in creating background shading for the final treatment.

After the initial coat was dry, I picked up a smaller flat brush, dipped it in one of the shades, and dappled it onto the splotched surface. when the paint was running dry on the brush, I would dip it into a different shade, and add that colour to the area that was still wet. I added some yellow paint, as well, to work as a highlight colour.

I tried to keep the pattern as loose as possible, to make it look random and more realistic. When the first side was done, I painted the reverse side, using the same technique. I also painted the edge of the tree shape the same way.

Next was painting the trunk and adding some visible branches. For that, I used two colours of brown: a true brown, and a tinted brown. The true brown was the base, and I used the tinted brown to make the highlights/squiggly lines to simulate bark. I did front, back, sides, and the base. I tried as much as possible to mirror the branches near where the trunk met the leaves on both sides of the puzzle.

I waited 24 hours to make sure the paint and wood were bone dry. Then I took the plank out to the scroll saw, and free handed a puzzle pattern. The only trick here was to make sure the outside pieces and the trunk linked together snugly, to ensure that when the puzzle was standing, there was a solid band around the perimeter that would prevent it from falling apart. I also cut out some random negative space within the puzzle, and trashed those pieces--it would make the puzzle even more difficult to assemble.

I took the puzzle back in, and used the true green and true brown paints to paint the inside edges of the newly cut puzzle pieces. I didn't worry too much about sanding, as the scroll saw blade was supa fine. I also didn't worry about making the inside pieces realistic, as I thought it would make the puzzle WAY TOO HARD if you couldn't clearly tell which pieces were the boarder (I had to reassemble the puzzle, after all). Unfortunately, I didn't a picture of this. The only picture I have that shows the painted inside edges is one that incidentally shows them. Albert was being cute.

I didn't want the added heft of lacquer since some of the pieces were VERY snug when put together and I didn't have a whole lot of time to wait for coats to dry, so I decided to use outdoor Mod Podge, since it's waterproof.


Bad idea. The glue-qualities of the Mod Podge made the pieces stick together very uncomfortably. So I decided to use a clear coat spray paint in a matte finish. Worked like a charm. This was the finished product:

Even after making it myself, it takes me about 30 minutes to complete it. It's especially hard because both sides of the puzzle were painted the same way. All in all, I think this is the start of my scroll saw puzzle hobby :o) Click for more pictures of the process.