Tuesday, May 18, 2010

DIY Sunburst Mirror Design

So I've noticed an alarming number of design blogs that feature sunburst mirrors. And I WANT one, but I don't want to shell out the $200 (for a cheapie) to $1500+ (for a HOLY F). And with my false sense of belief in my woodworking abilities bolstered by the relative success with the magnetic knife holder I made for my brother in law, I've convinced myself that I would make my own sunburst mirror out of a 3" thick piece of wood cut into a circle, a bunch of dowels of different diameters, some circular wood cut outs, and a convex mirror (the type you'd expect to see on the side mirrors of a truck). And maybe some spray paint for a guilded look--haven't thought that far yet. I think it'll be a relatively easy project to complete. Hooray for band saws and drill presses!
So tonight, I decided to put my Word drawing skills to the test, and I made a mock-up of what the mirror will look like (or, at least, what I hope it will look like). I'll add this to the list of things I want to make, like the mailbox. Now, keep in mind that this is a Word "drawing" and it's not to scale or anything, but you get the idea.

Tuesday, May 11, 2010

Look, Ma! No Hands!

So, I did a horrible thing. I pressured my siblings into agreeing to do hand-made gifts this last year (2009) for our sibling Christmas exchange. The rules were simple: after drawing names (including sister- and brothers- in-law and not-quite-in-law), each person could spend up to $20 in materials required to make something for the person they drew. They could use a photo of a cute nephew that they had printed and framed (see, homemade!), knitted a fabu scarf, cross-stitched some pretty scene, etc etc etc etc. We "drew" names in November, thinking that was plenty of time to get stuff done and shipped off to the recipient. And for the majority of those involved (including the super duper busy school teacher), it was plenty of time.
For me, the lamer, it was not. And last week, I FINALLY shipped off the present I made for my brother in law. In my defense, I hosted Christmas for John's family at the house, and I was DEAD sick the last week of Nov/early December with what I believe to be the swine flu, and then I was DEAD sick with food poisoning for several days leading up the Christmas. And then some personal ish happened at the beginning of the year, so all the creative gift things took a back burner.
There, now that I've made my excuses, this is what I made:
A Magnetic Knife Holder! See, my brother in law is an awesome chef, and awesome chefs need awesome places to store their awesome knives, where all can marvel at their awesomeness. It's true. And a knife drawer is a scary scary place, and a knife block takes up precious counter-top real estate. And John was lusting after these magnetic knife holders back when we first bought the house, so we thought (hah! as if we actually THOUGHT this project all the way through!!) we could EASILY make one of our own.
John originally bought a pretty piece of padauk for the project. But when we discovered just how HARD of a wood it is, the idea was scraped and I decided to use some hard maple shorts that we picked up at a local lumberyard. Rather than do the smart thing and hollow out holes using a forstner bit (ala this nice tutorial), I decided to use an Ikea Grundtal knife magnet as the base. Now, keep in mind that I think I know WAY more about wood working than I actually do, which proves that watching hours and hours and hours of The New Yankee Workshop on Sunday afternoons as a child and taking one wood working class through the local community college's continuing education program is MEANINGLESS in the real world.
So what I did was (and forgive the butchery of correct terminology used incorrectly) this:
First, I shaved about a piece of 3/4" x 2" x 3' maple into thin 1/8" strips using the table saw (I never said I was smart).
Then I took another 3/4" maple and cut the width/length down to accomodate the 20" x 5/8" Grundtal knife holder, adding about an inch on both sides and top and bottom (so the wood was roughly 22" x 3". Now for some reason, I thought this would be an EXCELLENT time to use a plunge router, which I had NEVER used before in my LIFE. So I haphazardly routered out a cavity in the maple block, roughly large enough to accomodate the Grundtal knife holder. After that, inserted the magnetic knife holder, added some extra nickle-sized magnets that were lying around (for extra magnetism), and laminated the 1/8" strips of maple on top of everything, using regular old wood glue. Now, if the 1/8" strips of maple were ever to come off to reveal what's underneath, it would look like a drunken termite had a heyday gnawing away the inside of the the wood. Seriously. Plunge routers are WAY harder to use than I had ever imagined, and I stupidly didn't set the depth stop correctly, so the depth of the cut changed frequently. And I didn't think to make some sort of JIG for the routing, so the inside edges are crazy crooked. So basically, it looks like an aerial photo of sand dunes--I'm not even kidding.
But anyway, I got it all laminate together. Only I didn't think that it'd be a super cool idea to make sure ONE edge of the lamination was flush. So instead I laminated the (2) 2" strips of maple to the 3" knife block holder, with roughly 1/2" hanging off either side. BRILLIANT. I thought I could just use the table saw to cut off the excess, which sounds perfectly reasonable. Except it isn't.
Oh no, it isn't.
See, something happened (still dunno what) and the table saw KICKED the knife block off to the side (into my side, actually--I got my first table saw injury!!) and gouged a HUGE hole in the side of the holder. At that point, I was ready to admit defeat.
But my brother in law (the awesome chef) is an awesome person (truly), and I didn't want to fess up to being retarded and not making him something for Christmas, especially since I'm the frigging idiot who decided to pressure my siblings into MAKING Christmas gifts. So I sucked it in (and bandaged my kick-back wound), and gave it another go. When I realized I didn't have enough maple left to start over, I decided to patch the gouge. So I laminated a new piece of wood to the side of the holder, waited for the glue to cure, covered all visible cracks with stainable wood filler, and properly cut it down to size. And it worked!
After several sandings with increasingly finer paper, the holder was ready to be stained. I chose a nice Red Mahogany stain (I wish I could say that I chose it because I thought my brother in law would dig it, but the truth is that it's the stain I had at hand...and I thought he'd like it?). Six coats of matte poly later, we have this: Look, you can BARELY notice where I patched the kick-back gouge!
I was a little worried the holder wouldn't be able to actually hold knives, so I tried it out on some we had at home. It actually works quite well!
I got done with the knife holder sometime back in late March, but it took me until last week to finally mail the sucker. Part of the problem was that I couldn't find anything to mail it in (all the mailing tubes I had were too short or WAY too long). Part of it was that I'm incredibly lazy and forgetful. Regardless, I shipped it to him last week, and word is that he likes it.
I think in a year or two, when I've either forgotten how insanely hard the seemingly insanely simple project is or when I take some more woodworking classes, I just might make one for my knives--it might, however, be the death of me! Click for bigger/more pics, if you'd like (ignore the dirty counters and cabinets!!!)

Friday, April 23, 2010

Spring Has Sprung

After my fall foliage wreath turned out so well, I took a stab at making an ornament wreath (using the instructions Eddie Ross so kindly provided) for Christmas. I used shatter-proof ornaments in blue and silver tones. It turned out ok. (Hmmm...I thought I had taken a picture of it before I put it into storage, but evidently I did not. Poo.)

Following Christmas, I replaced the ornament wreath with the pretty wreaths my sister made me for Christmas:
My mom insists on sending $5-10 for every "Candy" holiday (Halloween, Christmas, Valentine's Day, Easter). Since I'm making a concerted effort not to indulge in as much sugar-based-candy, I decided to use the money she sent me for Easter by purchasing insane-crafting-habits-based-candy. I had seen this Spring Wreath tutorial a few weeks ago, and thought it was so adorably cute. I had left over foam wreaths (8" and 12") from a failed Christmas wreath, and some pretty vintage flower ribbon, so all I needed to purchase was the Fun Fir.
The tutorial was very helpful, but it neglected to mention the seriously sore muscles from all the wrapping it takes to completely cover the wreath with "fun" fir. Like, wow. I made a few minor tweaks. First, with the flowers, I first threaded a metallic seed bead on the straight pin before I stabbed the flower as a little extra special touch. Also, because the wreath was going to be hung outside, I dredged each straight pin (with seed bead and flower already on) through some crafting glue before I stuck them to the wreath. And to ensure that the ribbon I used to connect the two wreaths together/to the door hook would stay put, I studded the entire circumference of the ribbon with seed beaded straight pins. All in all, it was a simple wreath to make, but I think it has a huge impact. It's cheery and whimsicle, and it makes me smile everytime I leave/enter the house, which ain't a bad thing!Click to see a few more shots of the wreath.

Monday, April 19, 2010

Coaster Piracy

I like pretty things, and when I see them for sale, I think "I could make that myself SO much cheaper!" so then I take a picture of it and go home with the intention of recreating it. Piracy? Perhaps. But I have no intentions of selling anything and they're all for personal use, so I'm a Private Pirate (not the be confused with a Privates Pirate, which is a whole 'nother kettle of fish). (Where does that phrase come from, anyway???? Bizarro!) So when I was at the Norton Simon Museum, celebrating the day of my birth last month, I saw the CUTEST coaster and wanted to recreate it at home. Isn't it cute?
As a wedding favour, my sister made the cutest hand-stamped coasters for each guest. She used beige ceramic tiles, a custom rubber stamp and enamel/ceramics paint to personalize each coaster with the little birdie motif that earmarked her wedding paraphernalia. They were a brilliant idea, and I use mine every weekday for my coffee mug at work. Jumping off her idea of painting tiles/stones, I made a grave marker for my friend Carrie's kitty that passed away last summer. So when I saw the pretty coaster (which turns out to actually be a paper weight--which I suppose explains the $20 price tag and the fact that there was just one in the package), I thought I could use the same paint to make my own pretty coaster. So I bought some 4"x4" travertine and marble tiles at Lowes for $5 per box of 10, and filled out my Plaid brand FolkArt Outdoor Paint spectrum, Google-Image searched "Flowers" for inspiration and got to work.

First I painted a Rembrandt Tulip with subtle pink/magenta variegations on the petals. The paint, though labeled OPAQUE, is rather thin and transparent, and required several coats to actually be opague.
This calla lily required about 6 coats of stark white before I could fill in the shading. Turned out well, I think.
And finally I painted a poppy, because poppies are pretty and cheerful and lend themselves to quite thin and transparent paint mediums, since they're petals tend to be quite thin and transparents anyway.
The paint is supposed to set in 48 hours. The stamped birdie on the coaster my sister made has held up pretty well for the past two years, so hopefully my coaster set will, as well. I think they make quite a lovely set, all in all.
Click for more/larger.
Those silly brits!

Monday, March 15, 2010

Lipstick on a Pig

Before we moved into our REO house that had sat vacant for over a year, we did a MASSIVE cleaning. John literally vacuumed an entire shop-vac full of dirt and dust off the carpeted floors, and I spent hours scrubbing toilets/showers/sinks/cabinets. We were so happy to be done with the cleaning push and then the move, that we didn't even think about decorating/painting. So for the last year, I've been living with paint colours that hurt my eyes, and no motivation to change things. Notice the GREEN walls.

Last April, I bought some paint when Home Depot was having a sale on Behr, including a mail-in-rebate. And just like to mail-in-rebate, I never got around to painting. Until last week. I taped off the downstairs bathroom, filled cracks/holes in the wall, and painted like a mad woman. Poor Josh had to ask to use the restroom. I decided to just paint the walls and deal with the molding/ceiling later (self-preservation).

I used Behr's Light French Gray (swatch can be found here: # 720E-2) on top of the sagey-green that was in the bathroom when we bought the house. Two coats of paint later, and it looks a bit like a baby-blue, and the cool paint colour is REALLY clashing with the warm undertones of the travertine and slate tiles. So I think I'll be repainting in the future, but not just yet. Maybe next year :o) I want a warmer gray, for sure. Slate blue/gray.

I also put up come of the 6-piece brushed nickle bathroom fixtures that John and I scored at Costco a few weeks ago for $30. I can't find them online, but for the $30, we got a large towel rod, a medium towel rod, a glass shelf, a 2-prong robe hook, a hanging towel loop, and a TP holder. Not too shabby! I bought two sets, so I'm going to mix and match them between the upstairs and downstairs bathroom.
I also got the hang the drawing I completed last week!

Tuesday, March 9, 2010

Know Which Way the Wind Blows

Last April, I bought some paint. I was going to paint the upstairs and downstairs bathrooms, because the SAGEY green in the DS bath and the LEMONY yellow in the US bath were killing me. I'm more of a warm gray/blue kind of a person, and my eyes were telling me they were in pain.
Then, I lost the motivation (because there were other things to do), and the cans of paint sat in the spare bedroom, collecting dust in the corner.
This last weekend, I got off my butt and spackled the holes, filled in the dents and dings, and resolved that this week, after work, I would FINALLY paint the walls in the damned DS bath. It'll be my first painting project as an adult (I remember half-heartedly helping my mom as a kid, though I doubtlessly did more harm than good), and I'm nervous about it (chicken-heart!).
But, I'll give you before and after pictures, so you can ooooh and aaaaah about my madskillz.
In the meantime, this is the drawing I completed the put in the bathroom once it's all painted and purty.
It's based off a photograph I found years ago (and I cannot find the original source of the picture, but here's the image). The original artist took a photo, pushed the contrast up to 11, and then created a negative of the image.
And here's my interpretation:

I think I like the original better--the square orientation is great, and I love how the trees look all wild and yet strangely calm.
Regardless, it's so moooooody, and I think it'll match the lovely french grey I chose for the bathroom, and the sheer size of it will help to fill up the massive blank wall above the tub. I'll post piccies when it's in place.
Click for more flash-tastic pictures of the drawing.

Wednesday, March 3, 2010

A New Life, What I Wouldn't Give to Have a New Life!

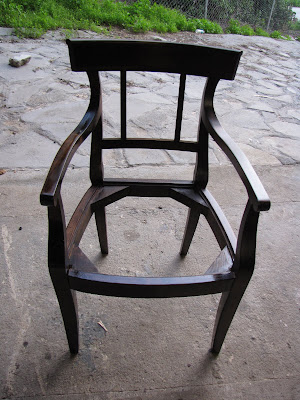
The lyrics to "A New Life" from Jekyll and Hyde are rattling through my head, because I gave a New Life (hah!) to a sad little seat-less chair John and I found outside ReStore last Octoberish. You might remember the picture from my post back in November. That it's below. Cute, isn't it? As I remarked, I'm certain the chair was hand-crafted, and the person who made it just gave up on finishing it. There were glue drips on it, and it was missing the center spindle on the back, and there were pencil details where the person had planned on hand carving the arms. It was solid, supple wood, and I decided that I simplyhadtohave it, so I doled out the $10 and John and I stuff it into the back of the Prius.And it sat in our dining room for several weeks. Around Christmas, when I was getting the house cleaned up for hosting John's family for Christmas dinner at our house, it got stacked on top of the other rescue-chair and placed in the spare bedroom. Then in February, I got the itch to DOSOMETHING with it, so it went out to the garage.
I first set about sanding it. Stupid, I tried it by hand. Even with the 80-grit paper, I was getting no where. So I pulled out John's oscillating power sander and got to work sanding the sucker down. First 80, then 100, then 200.
After, oh, about 2-straight hours of sanding, I was satisfied that it was ready for staining.
I used Minwax Poly Oil in Red Mahogany, because that's what I had on-hand at the time, and I tend to prefer darker woods with red undertones (no oak for me!).I applied the stain using a sponge brush, and it worked out quite well. After letting it set for 20 minutes, I removed the excess stain with a rag. And it looked blotchy as hell. I was disheartened, and appealed to John's vast knowledge base of woodworking techniques. A second coat, he recommended.
And Boy oh Boy, did the second coat make a difference! Didn't it look much better?
A few days later, I was ready to apply the clear coat. I used a matte-finish Minwax Poly that worked with the oil stain.
I applied three coats, because that's what's recommended by the manufacturer. There are some slight imperfections in the coats, but I was alright with them and decided to stop futzing--after all, it doesn't have to be PERFECT.
Next I set about making the seat. This was a pain in the butt. First, I cut out a square from a sheet of crappy 3/4" plywood we had sitting around (NOT furniture grade, just the cheap stuff from Home Depot that we had originally purchased to make a work bench and never got around to using). I then cut out a large piece of clear plastic bag, and taped it to the seat of the chair. Using a marker, I traced out the seat-ridge on the chair, so I'd have a template to apply the the plywood. I cut the plastic to size, and then traced it onto the plywood. I started out using the band saw, but there's something up with the blade because it kept going off at weird angles. John wasn't around to help figure out what was wrong with it, so I just soldiered through. I also tried using the jig saw to cut it, but I think I was using the wrong kind of blade because it kept CHEWING up the wood without REALLY cutting it. I managed to whittle away enough wood to get it to sit correctly on the seat, so I was happy. The wood bottom for the seat looks HORRIBLE, but I figured that since it'll be covered with fabric, who cares? I (smartly) didn't take any pictures of the horribly ugly seat, so I will spare you the sight.
I then took the chair and seat into the house, and attached the fabric in the same way I did with the other chairs I reupholstered.
I bought a 2" foam pad, and once I got the fabric on, I decided I didn't like it much--it resembled a mushroom, and wasn't the sleek look I had in my mind. So at SOME point in the future (who knows when?), I'll redo it. But for now, I'm happy with it. I think the chair looks lovely, and I'll ignore the puffy set with the off-center pattern, and enjoy the new seat in the living room.
Click here to see more pictures of the process (no commentary, just pictures). All in all, I think I probably spent, oh, 6 hours working on the chair. Here's the budget breakdown.
Chair: $10
Fabric: $10
Stain: Already had
Clear Coat: $5
Sandpaper: Already had
Foam Pad: $12
(Mostly) Finished Product: Priceless
I'm going to start working on the other chair we bought at the same time, sometime soon.