So, one of the main reasons I decided to start this blog was that I thought it would give me motivation to continue doing home renovation projects. It's a lofty goal, and one I hope to continue to work towards.
So, I thought that as extra motivation (because I need it!), I would post the REALLY BIG list of things John and I want to accomplish with this house, from the tiny (switch out the light and outlet plates to all WHITE, instead of a mish-mash) to the huge (pop-the-top on the second story and do a complete gut job of the bedrooms/bathroom/laundry room). And (!) I'll cross things off as we complete them (because, you know, I REALLY love to cross things off lists--so much so that I'll even add things I've already done when I'm writing a list just so I can cross them off------in my defense, I only add things that are directly related to the list, and not just mundane stuff like "wake up" and "brush teeth" and "pet the cat.")
Here's the list. Click the links to see pictures of what I'm talking about. Note that the pictures, unless otherwise noted, are from before we moved in. That's why it's so dirty!
YARDSBackyard
Build retaining wall at back of yard
Build
retaining wall at front of yard Build
walled steps to the leveled backyard Fill in backyardCreate patio area
Create seating area
Seed with fescue
Front YardPatch concrete driveway
Replace concrete drivewayReplace mailbox
Remove spindly coniferous tree from the island and replace with a fast-growing deciduous tree
Create steps from the
center of the parking pad up to the porch (right now, you have to walk all the way to either side of the property to walk up to the house—not that big of a deal, unless you’re carrying an armful of groceries in the rain or a screeching howling scratching writhing cat that DIDNOTENJOYTHEVETVISIT!)
Landscape/ xeriscape
Lighting/ElectricalChange out light fixture in DS hallway
Change out light fixture in bonus room
Change out light fixture in DS master and replace with a ceiling fan
Correctly ground all power outlets
Replace standard toggle light switches with more modern, square toggle light switches
Replace standard rounded power outlets with more modern, square power outlets
Painting (Requires wall prep before hand--patching drywall, sealing crown molding)
Paint DS bathroom Check!Paint dining room
Paint kitchen
Paint foyer
Paint living room
Paint stair well
Paint office
Paint US master
Paint US bathroom
DOWNSTAIRSAll over DSReplace
carpeting with bamboo flooring
Add molding around
window framesCreate and install screens to all windows
KitchenAdd hardware to all cabinets and drawers
Create and install glass shelves in the
window alcove/opening above the sink
Create and install floating cabinet above freezer to house bulk items, cook books and display
Add pull-out cabinet organizer to pots/pan lid cabinet
Install shelf dividers in cabinet above fridge
Build new base for oven/range so the surface is flush with counters
Install baseboard and toe kick underneath the dish washer
Buy and install a
new sink Add medallions around light fixtures
Replace dinky light above sink
Add task lighting underneath cabinets
Install bar to hang commonly used utensils from
Replace sliding glass door with French doors
Install new screen door
Extend cabinetry to the right of the fridge and create a kitchen island with more storage/counter space and a breakfast bar
Vent the oven to the outside--cover duct work with a soffit the runs the length of the cabinets
DS Bathroom
Dry-wall over existing door from DS master into bathroom
Move existing door from hallway into bathroom over three feet so it's centered on the wall
Create and install built-in cabinetry on new wall
Remove
existing mirror Add new mirror
Install a new light above the vanity (with its own separate switch)
Install vent fan above shower
Replace backsplash on vanity so it no longer clashes with granite of the countertop
Change height of pendant light
Remove and replace block of tiles on the shower deck that do not match the finish of the surrounding tiles
DS MasterReplace
closet doors (mirrored doors just ain't cutting it)
Remove
large mirror above fire place
Dining RoomChange height of pendant light
Create and add built-in closet to right of window
Create and add built-in cabinetry to left of window (with an open area for the fish tank to slide into)
Create and add window seat between new built in cabinetry
Dry-wall over existing side light windows into the bonus room
Dry-wall over existing door opening into the bonus room
Bonus Room
Dry-wall over existing
side light windows into the dining room
Dry-wall over existing door opening into the dining room
Replace
paned door from the hallway with a solid door
Frame in a closet
Living Room
Add air ducting and register to living room
Remove existing
fireplace and mantle Replace fireplace with a gas-insert unit
Create and add new fireplace mantel
Create and add built-in cabinetry on both sides of fireplace, including a closet
Add molding to create a coffered ceiling in the living room and dining room (to hide all the unevenness in the drywall!)
Rewire lights so they work independently of one another and replace light switch with a switch bank
Remove
columns that lead into the kitchen--frame out and dry wall over
Remove
columns that lead into the dining room--frame out and dry wall over
UPSTAIRSStairsPatch
hole in drywall
Replace
stairway and make the incline more gradual.
Add internal closet under stairway (the existing closet is on the OUTside of the house)
Replace single-paned window in stair well with a double-paned window
Replace
cheap-looking balusters and rails with something more in line with the overall look of the house
MasterFix the
leaky dormers
Organize
walk-in closet Office
Replace desk
Add more bookshelves for storage
Create and install pegboard for material organization
Fix the leaky dormers
Add permanent shelving storage to closet
Laundry RoomAdd a removable shelf above washer/dryer that spans the length of the room and the width of the machines to prevent stuff from falling behind the appliances!!!
Properly vent the dryer
Replace carpeting with tile/vinyl/anythingbutcarpet Install room spanning bar to air-dry clothing
Furniture ProjectsRefinish the vintage Henredon bedroom furniture set I scored at ReStore
Refinish mid-century arm chair, upholster seat
Refinish both wood chairs, upholster seat/back
Complete the console table for the foyer
Make a sofa table
Make a large work table/drafting table for office
Make a laptop stand (John’s project!)
Refinish headboard from our first sleigh bed (it’s rather cheap, and the “finish” is starting to chip like crazy)
Build side tables for around the couch
POP THE TOP (
the biggest dream of all time!)
Replace
5 tiny gabled dormers at the front of the house with two larger gabled dormers (one in the master, one in the new bedroom)
Add two more large gabled dormers (one in the master and the other in the new bathroom) with a bridge spanning the two (where the new master bath will be!).
Similar (but much larger) to this.Divide up the current large
walk-through “bedroom” and separate laundry room into a third bath/laundry room, hallway, and actual bedroom
Add a balcony to master bedroom at backside of the house (new large gabled dormer would have doors that leads to the balcony)
Change opening into walk-in closet from the master bedroom
Replace current
French doors and Juliet balcony in the master with windows
Add ceiling! Vent the attic! Add an attic fan! COOL THE UPSTAIRS!!!!!!!


 And it sat in our dining room for several weeks. Around Christmas, when I was getting the house cleaned up for hosting John's family for Christmas dinner at our house, it got stacked on top of the other rescue-chair and placed in the spare bedroom. Then in February, I got the itch to DOSOMETHING with it, so it went out to the garage.
 I used Minwax Poly Oil in Red Mahogany, because that's what I had on-hand at the time, and I tend to prefer darker woods with red undertones (no oak for me!).
 I applied the stain using a sponge brush, and it worked out quite well. After letting it set for 20 minutes, I removed the excess stain with a rag. And it looked blotchy as hell. I was disheartened, and appealed to John's vast knowledge base of woodworking techniques. A second coat, he recommended.
 And Boy oh Boy, did the second coat make a difference! Didn't it look much better?
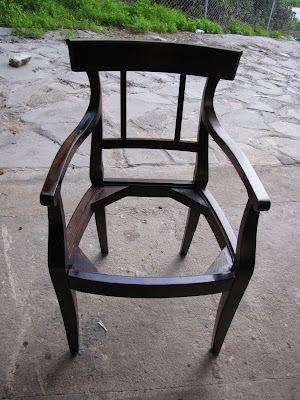 I applied three coats, because that's what's recommended by the manufacturer. There are some slight imperfections in the coats, but I was alright with them and decided to stop futzing--after all, it doesn't have to be PERFECT.

 I was wrong, and nearly a year later, it's still a beacon of BRIGHT BRASS at the end of our drive way. I fear the neighbours think we're equally garish and that the house is decorated with gold lame' curtains, turquoise painted walls, and oooooooodles of white furniture (not that there anything wrong with that, if, you know, you're into that sort of thing). As my mom pointed out, most people WANT to keep their brass from tarnishing, but I'm not one of those people, and I'm too lazy/unmotivated research how to remove the protective coating on the brass.
