
My mom insisted that my two brothers, sister and I took specific projects in 4-H when we were kids. Our first year, we had to take Helping Mom & Dad (a ploy to get us to pitch in more) and Idaho Wildlife (in hopes of fostering naturalist feelings towards our native fauna). The second year, we could take one project of our choosing, and we also had to take a project on native weeds plants. Now, for me, that was torture. By that time, I had spent a summer out in the bean fields, grudgingly weeding (or, as I like to say, Hoe-ing. Yeah, so I can tell people that I was a professional Ho-er by the time I was 11. I get some craaaazy looks, and it amuses me so). I hated weeds and had no appreciation for their non-weedy kin. But I really wanted to take the other project (cooking, I believe), so I took up the flora cause and spent the summer collecting, pressing and preserving the various native and non-native weeds plants of Idaho's Snake River Plain. Yee-haw. (I guess there's some lesson in knowing one's enemy)
Why am I mentioning it? Because one of things we had to do as part of the project was create a weed plant press. And my mom's design was, quite honestly, ingenious, and I don't think I've seen it replicated. And lately, I've had this URGE to squeeze the life-blood out of the weeds plants that litter my landscape. So I decided to recreate my mom's ingenious weed plant press, and take some piccies of the finished product. Because, you know, *someone* might be planning on forcing their kidlets into taking a Flora Preservation/Appreciation project in 4-H or they're trying to foster some young naturalist tendencies in their precocious offspring.
Supplies:
- Pre-finished Pegboard (~2' x 4' is sufficient) Mine has an enameled finishon one side, bare on the other
- Long machine screws with round ends. Mine are 3" and 1.5"
- Matching washers
- Matching wing nuts
- Jig or table saw
- Newspaper or Corrugated cardboard
I didn't bother to take pictures of the process, as I was lazy and didn't think they'd add much (and I made enough mistakes that I would have felt embarrassed to have documented them).
First, I cut the pegboard into two 17" segments (leaving me a good amount left over), giving me two 17" x 24" boards. I cut ~10 off the length of these, making them ~17" x 14". Next, I put wrong-sides together (be sure to do this!!), and lined up the holes. I then used the table saw to cut off the excess. I did the same thing with the two 10" x 17" remnants, and then cut them in half length-wise, so I had two more small presses (I'll give one to my friend who loves wildflowers).
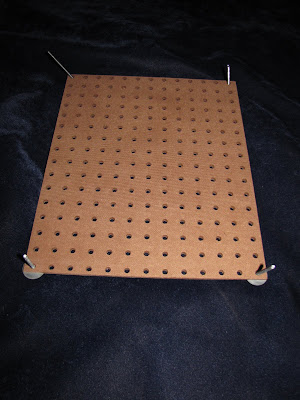
That's all it takes (plus the screws, washers, and wing nuts)--the press is now ready to use. All you have to do is take the screws and one washer per screw, and thread them through the four corners of one of pieces of pegboard. Layer newspaper (or corrugated cardboard; whatever floats your boat), a single layer of weeds plants, then more newspaper, then more weeds plants, etc etc. After a reasonable number of layers, add the matching piece of pegboard and slide it over the screws. Add the second washer and screw it down using the wing nuts. Et voilà! An easy to use, easy to assemble weed plant press. For the larger press, I added a second set of screws/washers/wing nuts to the center of the lengthwise edge on each side, just to give it a bit more pressing power. The holes of the pegboard allow enough air to penetrate through the newspaper to adequately dry the weeds plants. It might not be as fancy-schmancy as some retail plant presses, but it works well for me!
I bought the 2' x 4' sheet of pegboard from Home Depot for $6.15. The screws, washers, and wing nuts cost $6.66 (freaked out the cashier!). So for around $14, I have three rather nice, quite kick-assery weed plant presses. Awesome.


Click for more pictures, although they're just different shots of the same thing :o)

And, for good measure, a picture of Albert.