
The first night of class at the beginning of the semester, when the instructor briefly talked about the materials we would be using, I had an instant idea of what I wanted to make out of wire. I was so excited about it that I couldn't get my mind to stop thinking about it when I went to bed, so I finally got up and grabbed my sketchbook and made a lovely scribble of the idea. Then I could sleep. I really wanted to make a bird.
My grandma was a great collector of bird sculptures. By then end of her life, she had (literally) hundreds of bird sculptures and trinkets. The curio cabinet she had commissioned was CRAMMED full of them. They perched on window sills and graced tabletops. They peaked out from behind books, and were gracefully poised on the floor. Now, 5 years after her death, I still have the fleeting "Grandma would like this" thought every time I pass a bird on a shelf. While my grandma's love of birds wasn't really the motivation for the sculpture, I can't help but draw a connection between the two.
So, for the first sculpture (heavy), I took some tie wire (the stuff used to tie rebar together) and wound it into a pear shape--this was the body. I got my Crawford on and cut up some wire hangers. I bent one length in half, and then bent the ends on themselves so they formed a "V" and then inserted it into the larger part of the body for the head. Then I wound more tie wire around the wire hanger to form a ball, with the two "V" shapes still poking out to form the beak. I created the wings using more hanger and bent them in the same manner as the head/beak, and attached them to the side of the body. I then wound more tie wire around them to cover up the hanger--when I got to the tip of the wings, I changed the way I wound the wire from vertical to horizontal, and I pinched the end of the horizontal to form feathers. The tail was formed the same way as the wing (vertical winding around the base, horizontal winding around the end). (I can't describe the process very well, and I didn't take pictures!). I then wove different gauges of jewelry wire and galvanized steel wire (22, 24, 28, 32 gauge) through the tie wire. I wanted the surface to have an almost stitched-together appearance, and weaving the wire achieved that.
For the bases of the two pieces, I wanted to take a stab at creating hypertufa, which I had read about on blogs last spring. It's basically faux stone made out of Portland Cement, Peat Moss, and Vermiculite/Peralite. I followed this recipe, and used the bottom of milk carton for the Heavy sculpture (I made it as square as I could) and the bottom of a small gift box for the Light sculpture. After the hypertufa had set a bit, I stick in more pieces of wire hanger (bent into a "U" shape, with the rounded part above the hypertufa) for the Heavy piece, and a length of welding rod in (bent into an "L" shape with the vertical part above the hypertufa) for the Light piece. After it was completely set, I bent the "U" so it went up vertically from the base, and then bent at a 45 degree angle about two inches up. For the Light base, I bent the rod into a curved shape similar to a shepherd's crook with an upward curve at the end.
After the bases were finished, I took the Heavy base and wound jewelry wire around the entire length of exposed hanger. I took four lengths of tie wire and bent two into a "U" shape, and then bent the ends so they faced down. The other two I kept straight, but I bent the ends down. I then attached a "U" shape and a straight wire to each "leg" of the hanger above the base. These formed the feet of the bird. I wound more jewelry wire around the feet/toes/legs of the bird, until I was satisfied that they looked sufficiently bird-like. Then I attached the body of the bird to the bent "U" of the hanger using tie wire and jewelry wire, and camouflaged the hanger as well as I could.
All in all, I'm EXTREMELY happy with how my Heavy piece turned out. It fits almost exactly what I had visualized when I was thinking of the project, and I think it successfully fit the parameters of the Heavy project. I think I took about 15 hours to make this bird (though at least some of that was because I'd never used wire for anything aside from unlocking doors or pulling trapped chip bags out of vending machines).

 Everyone thought it was apropos that it looked like a Raven, considering Halloween is approaching. I think it's beautiful, and I'll happily keep it out year round. I was actually proud enough of it that I SHOWED it to someone at work!
What I did for the Light piece was a bit more of a let down. Basically, I used 18 gauge wire to create the outline of a bird in flight. I used as little wire as I could get away with--3 separate lengths (one for the body/tail, two for each set of wings). It's not my best work, but it fit the parameters of the project.

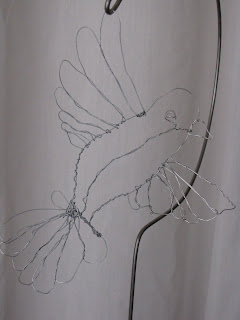 One of my classmates liked the Light piece a LOT and asked what I was going to do with it. I said I didn't know, and she said that she would love to have it. So it's now cluttering up her room, I presume (or sitting in the trunk of her car, or populating the bottom of a waste bin....).

 One of my classmates liked the Light piece a LOT and asked what I was going to do with it. I said I didn't know, and she said that she would love to have it. So it's now cluttering up her room, I presume (or sitting in the trunk of her car, or populating the bottom of a waste bin....).
